Monthly Archives: جانفي 2016

نمط التصميم سنجلتون (الوحداني) Singleton Design Pattern


في هذه المقالة القصيرة سوف نتعرف على نموذج التصميم سنجلتون (تعني الوحيد من نوعه)، وهذه فعلا مفهوم نمط التصميم الذي سوف نتعرف إليه. الفكرة من هذا النمط هو تشيد أو بناء صف (كلاس) يكون وحيد ولا يمكن إيجاد سوى نسخة وحيده منه. يستخدم نمط التصميم هذا عندما يكون لدينا بيانات ثابتة ومشتركة في البرنامج الواحد. ربما يتبادر إلى ذهنك الآن أن هذا ممكنا باستخدام الصفوف الستاتيكية، وهذا كلام صحيح إذ أنه يمكنك استخدام الصفوف الستاتيكية للإحتفاظ بنسخة وحيدة من البيانات ومشاركتها بين جميع صفوف أو وحدات البرنامج دون الحاجة ولا حتى المقدرة على انشاء عدة نسخ منه. لكن ليس هذا هدف هذه المقالة ، هدف هذه المقالة هو التعرف على كيفية بناء صف عادي (ليس ستاتيكي) لتحقيق شيء مماثل للصفوف الستاتيكية وزيادة. الزيادة التي أعنيها هنا هي أن بناء صف عادي سوف يقدم لك مزايا لا تتوفر في الصفوف الستاتيكية. أرجوا أن أكون باختصار قد قدمت لك فكرة نمط التصميم "الوحيد" سنجلتون. الآن سوف نبدأ التعرف كيف نحقق ذلك برمجيا باستخدام لغة السي شارب. لاحظ كود 1 الذي يوضح الهيكل البدائي لإنشاء صف من نمط التصميم سنجلتون. تم تعريف الباني "constructor" بأنه خاص حتى لا يستطيع أحد إنشاء نسخة منه باستدعاء البناني ولو حتى مرة واحدة من خارج الصف. طبعا حاليا الصف بصيغته الحالية لن يمكن أحد من إنشاء نسخة منه بسبب التحفظ على البناني للإستخدام الداخلي ضمن نفس الكلاس فقط.

كود 1 الهيكل البدائي لانشاء صف من نمط سنجلتون

public class Singleton
{
    private Singleton() { }
}

الآن سوف نعرف خاصيّة تمكن مستخدم هذا الصف من التعامل مع نسخة من هذا الصف ولتهيئة نسخة من الصف داخليا في حال لم يتم ذلك بعد

كود 2: إضافة الباني وخاصية للحصول على نسخة وحيدة من الصف

1 public class Singleton
2 {
3      private static Singleton instance;
4      private Singleton() { }
5
6      public static Singleton Instance
7      {
8           get
9           {
10              if (instance == null)
11              {
12                   instance = new Singleton();
13              }
14
15                  return instance;
16          }
17     }
18 }

والآن أصبح الصف شبه جاهز حيث أن الخاصية Instance سوف تكون بمثابة الواجهة للصفوف الأخرى. الخاصية Instance سوف تعيد نسخة من الصف الحالي Singleton في حال توفرها، وإن لم تتوفر ستقوم باستدعاء الباني ليتم بتجهيز نسخة من الصف وتمريرها. وبما أن نوع الحقل هو ستاتيك فسوف نضمن أن هذه القيمة ستكون وحيدة. مرة أخرى الصف شبه جاهز، لأن مازال هناك احتمال حدوث أكثر من نسخة من الصف في حالة multi-threading، حيث أنه من المحتمل أن يتم فحص الشرط instance == null في نفس الوقت من قبل أكثر من thread، وبالتالي هذا سيؤدي إلى إنشاء أكثر من نسخة من الصف. لحل المشكلة السابقة سيتم استخدام تقنية lock في السي شارب التي تضمن السماح لـ thread واحد فقط بعمل الفحص وإنشاء نسخة من الصف في حال أن ذلك لم يحدث سابقا. بعد التعديل الكود السابق، سيصبح الكود الجديد المبين في

1 using System;
2
3 public class Singleton
4 {
5      private static object syncRoot = new Object();
6      private static Singleton instance;
7      private Singleton() { }
8
9      public static Singleton Instance
10    {
11         get
12         {
13               if (instance == null)
14               {
15                     lock (syncRoot)
16                     {
17                          if (instance == null)
18                          {
19                               instance = new Singleton();
20                           }
21                      }
22                }
23
24                return instance;
25          }
26     }
27 }

أصبح الكود الآن آمن للإستخدام مع multi-threads، لاحظ السطر 13 و 15، في هذه الحالة سوف يتم السماح لـ thread واحد فقط بالعبور وإنشاء نسخة من الصف في حال أن ذلك لم يحدث سابقا. قد تتساءل ما الفائدة من وجود شرط الفحص في السطر 13 وذلك لعدم السماح بتعطيل threads ، حيث أن بدون هذا الشرط سيؤدي إلى تنفيذ أمر القفل (السطر 14) كل مرة يتم فيها استدعاء الخاصية وبالتالي سيؤدي إلى توقف الـ threads الأخرى (إن وجدت) عن العمل ريثما يتم تحرير القفل. أخيرا قد تتساءل حسنا فما الفائدة من تكرار شرط الفحص في السطر 17، لأنه إذا فرضنا أن أكثر من thread استطاع اجتياز الشرط الأول (طبعا هذا وارد الحدوث في المرة الأولى التي يتم فيها استخدام الصف) وبالتالي ستقوم الـ thread الأولى بإنشاء نسخة من الصف بينما تنتظر الـ thread الأخرى تحرير القفل لتقوم هي مرة أخرى بإنشاء نسخة جديدة ثانية، وهكذا. لتجنب هذا الأمر فإنه سوف يتم إعادة فحص الشرط للتأكد أنه لم يقم thread سابق بإنشاء نسخة من الصنف قبل ذلك. مرة أخرى هذا وارد الحدوث فقط في حال multi-threading ولا يوجد نسخة للصف سابقا.

أرجوا أن أكون قد وفقت في الشرح

أضطررت لإستخدام المصطلحات الانجليزية لتفادي الوقوع في المشاكل جراء الترجمة لأن الأكثر يتبع المصطلحات الانجليزية.

المراجع:

Implementing Singleton in C#: https://msdn.microsoft.com/en-us/library/ff650316.aspx

‘Target’ Attribute in WPF

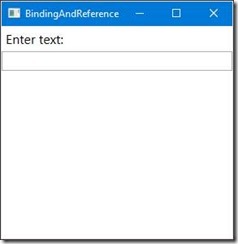
This short article is going to explain the usefulness of ‘Target’ attribute in WPF. Keep in your mind is that Target attribute is used to set focus on an element in the WPF Window when the access key associated with the element is hit. In other words, Target attributes is used to set focus on another element associated with the current element when the access key is hit. For example, let us build a Window with Label and TextBox

clip_image002

<Window x:Class="WPFTester.BindingAndReference"

        xmlns="http://schemas.microsoft.com/winfx/2006/xaml/presentation&quot;

        xmlns:x="http://schemas.microsoft.com/winfx/2006/xaml&quot;

        xmlns:d="http://schemas.microsoft.com/expression/blend/2008&quot;

        xmlns:mc="http://schemas.openxmlformats.org/markup-compatibility/2006&quot;

        xmlns:local="clr-namespace:WPFTester"

        mc:Ignorable="d"

        Title="BindingAndReference" Height="300" Width="300">

    <StackPanel>

        <Label FontSize="16">Enter text:</Label>

        <TextBox x:Name="txtName" FontSize="16"></TextBox>

    </StackPanel>

</Window>

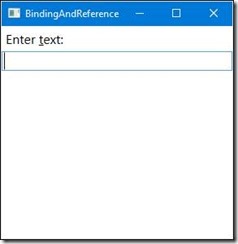
Now, we are going to create an access key (for example, Alt + t) which when it is hit, the cursor will be set in the text box directly. To do that we need to set the attribute ‘Target’ of the label, so that when Alt + t is hit, the focus will be on the TextBlock, so that the user can enter his or her name. XAML code will be modified to look like follow:

<Window x:Class="WPFTester.BindingAndReference"


    <StackPanel>

        <Label Target="{Binding ElementName=txtName}" FontSize="16">Enter _text:</Label>

        <TextBox x:Name="txtName" FontSize="16"></TextBox>

    </StackPanel>

</Window>

The modified or added code has been highlighted, the rest of the previous code is intact. The label is bound to the TextBox through Target attribute of the label. Note that ElementName refers to the element name associated with its label. To set a name to a control, use ‘x:Name’. Note, to set the access key use the symbol ‘_’ before the letter that you need to associate it with Alt combination.

clip_image004

Welcome to jQuery world!

This is my first article about jQuery. jQuery is simply JavaScript. The idea of jQuery isjquery_bumper-sh-600x600 writing less code to do more actions that would be longer by using standard JavaScript.

Firstly, to write jQuery code, you need to embed jQuery library. There are several ways to do that either by downloading the library from www.jquery.com website, then include it in your built website, or you can refer to it online as Microsoft and Google have provided jQuery library by their Websites.

If you include the library in your website, the code will look like the follow:

إقرأ المزيد

var vs. dynamic in C#

This is going to be a very short article talking about var vs dynamic features in C#. var is a new keyword added to .NET 3.5. var is a new way to declaring variables in C#. In other words, instead of specifying the type of the defined variable, the compiler is going to figure out the data type of the declared variable.

For example, you can use var deceleration keyword instead of using int in the following lines.

  1.  int x = 3;
  2.  var y = 3;

For your information, both previous lines are exactly the same. Where the first line was written using int keyword to declare an integer variable; whereas, the second line used var to let the compiler figure out the value type. Both of the variables, x and y are integers variables.

This is helpful especially in complicated declared types when using LINQ.

dynamic was introduced in C# 4.0 where it is a new way to declare objects and variables. The main objective is that to let the compiler ignore type checking during the compile time, and force it during the run-time. If you rewrite the previous example using dynamic, you will not notice any difference in the execution.

  1.  dynamic z = 3;

The only difference is that the compiler has no idea about the data type of the variable z during the compile-time, but during the run-time. This is why it is called late bound.  This could be useful in certain matters where you need to deal with interoperability for example.

To recap, var is considered as early binding where data type determination and method lookup are done during compile-time; whereas, dynamic is a late bound where data type and method lookup are carried out through the run-time using reflection. Thus, we can conclude syntax checking happens during compile-time and typos must be corrected before program execution when using var; while dynamic syntax could throw errors during the run-time as syntax checking never happens before execution. To illustrate the last point, consider the following example:

  1. var s1 = “Hello”;
  2. int n1 = s1.Leng;
  3. dynamic s2 = “Hello”;
  4. int n2 = s2.Leng;

notice that the property name is wrong on purpose, Line 1 has a syntax error as type checking took place during the compile time. Unlike var, using dynamic is not going to highlight any syntax error in compile-time (Line 4 has no problem during compile-time), but an error will be thrown during the run-time after type checking takes place and property lookup-operation fails to find a property with the name ‘Leng’.